
Thai · Dessert
Tapioca Coconut Mini Cookies (kanom ping) ขนมผิง
From the zcook collection
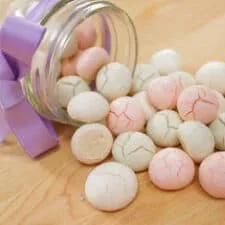
Tiny Thai tapioca cookies with pandan coconut syrup, a crumbly texture and optional pastel colours.
- Vegetarian
- Dairy-free
- Thai
- Dessert
- tapioca cookies
- Total
- 1 hr 50 min
- Prep
- 20 min
- Cook
- 55 min
- Serves
- 90–100 mini cookies
- Level
- Medium
Method9 steps · about 1 hr 50 min
Step 1: Combine coconut milk (1 cup), sugar (1/2 cup) and pandan leaf (1 piece) in a heavy-bottomed pot and simmer for about 25 minutes, stirring occasionally, until it has a thick syrupy consistency (it will thicken as it cools, so it may not look super thick while it's still hot).
Step 2: Remove the pandan leaf and let the syrup cool until it's lukewarm, then stir in an egg yolk. If you want to colour the dough with only one colour, you can add the food colouring to the syrup at this point.
Step 3: Put 260 g tapioca starch in a bowl and knead in the cooled coconut egg syrup until smooth. The dough should hold its shape as small balls. If it is too stiff to knead, add water only a little at a time; if balls slump, add a little extra starch without over-diluting the coconut sweetness.
Step 4: Only if making multiple colours and no colour was already added to the syrup, divide the dough and knead each chosen colour into its portion until even.
Step 5: Cover the dough with plastic wrap and let it rest 30 minutes so it does not dry out.
Step 6: Meanwhile, preheat the oven to 350°F/175°C.
Step 7: Form the dough into small balls and place them on a baking sheet lined with parchment or a silicone baking mat, or generously greased with oil. Bake 25–30 minutes until the bottoms are lightly browned. For consistent results, bake one tray at a time; if baking two, switch their positions halfway through.
Step 8: Once the cookies are done, turn off the oven and open the oven door for about 8 seconds to drop the temperature, then put the cookies back in and let them cool in the warm oven. This step is optional but I recommend it as it allows the cookies to dry out completely and help lighten the texture. This also prevents the cookies from becoming too dense especially if your dough was on the dry side.
Step 9: Once cooled, package them into an airtight container and enjoy!
Photos (1)
Comments
0 threadsSign in to join the discussion.



No comments yet. Start the discussion.