

Japanese · Snack
Chicken Wing Gyōza
From the zcook collection
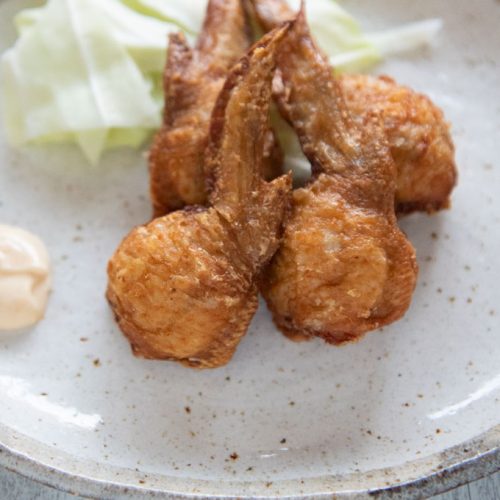
Eight deboned wingettes filled with pork and prawns, briefly marinated, dusted with cornstarch and fried twice until crisp, with chilli mayonnaise and cabbage.
- Dairy-free
- Spicy
- Japanese
- Snack
- Stuffed chicken wings
- Total
- 1 hr 15 min
- Prep
- 25 min
- Cook
- 20 min
- Serves
- 8 pieces
- Level
- Hard
Method31 steps · about 1 hr 15 min
Step 1: Lay out all eight raw wingettes with their tips still attached and drumettes removed. Working on the first wingette, use kitchen scissors to cut the tissue joining its thin radius bone and thicker ulna bone at the open end. Keep the remaining seven wings cold while you work.
Step 2: On that first wingette, cut the flesh away from the outside of both bones little by little, keeping the skin intact.
Step 3: Carefully cut away the flesh between the two bones as well.
Step 4: Move the scissors gradually deeper, freeing the flesh more than halfway along both bones without piercing the skin.
Step 5: Push the loosened meat down gently with your fingertips to expose the ends of both bones.
Step 6: Hold the exposed thin radius bone with one hand and the wingette-to-tip joint with the other. Twist and tilt the radius beyond ninety degrees against the joint’s normal bend to dislocate it, taking care not to tear the skin.
Step 7: Push the exposed end of the radius upwards, then pull that bone out, freeing any attached tendon and flesh as needed.
Step 8: Dislocate and remove the thicker ulna in the same way. Cut stubborn ligaments with the scissors if necessary, keeping the skin whole. The wingette should now form an empty skin-and-meat pocket with its tip attached.
Step 9: Repeat steps 1–8 on each of the other seven wingettes. Keep all eight deboned pockets together in a clean bowl and discard the removed bones. Clean the board, scissors and hands after raw-chicken handling.
Step 10: Put all eight deboned wingettes in a resealable bag with the tablespoon each of cooking sake (1 tbsp) and soy sauce (1 tbsp). Massage gently so the marinade coats the pockets.
Step 11: Press out excess air, seal the bag and refrigerate for thirty minutes to marinate. Prepare the filling during this wait.
Step 12: Remove all eight wing pockets from the bag and pat them dry with kitchen paper. Discard the spent raw-chicken marinade; keep the dried pockets cold until filling them.
Step 13: Dice all 100 g peeled raw prawns into about 1 cm cubes. Set aside one quarter, 25 g, of the diced prawns; keep the other 75 g beside them for making paste.
Step 14: Press the selected 75 g of prawn cubes flat with the side of a cooking knife to make a paste. Leave the reserved 25 g cubes separate.
Step 15: Put all 70 g pork mince and both pinches of salt in a bowl. Mix and knead firmly several times until the pork becomes sticky.
Step 16: Mix the prawn paste into the sticky pork with the two tablespoons finely chopped green onion, separate half-tablespoon filling cornstarch (½ tbsp), quarter-teaspoon ginger juice and a little sesame oil.
Step 17: Fold all the reserved 25 g diced prawns into the filling until evenly distributed.
Step 18: Divide the complete filling into eight equal portions and keep cold while stuffing the wings.
Step 19: Take one of the dried marinated wing pockets and hold it with the opening facing upwards. Keep the other seven pockets cold.
Step 20: Use a small spoon or pâté knife to add one filling portion to the pocket a little at a time. Fill the cavity only about eighty percent full, leaving room for the chicken to shrink; keep any excess filling cold for separate thorough cooking.
Step 21: Press the filling down gently so its surface remains about 5 mm below the opening, leaving enough skin to close the pocket. Remove a little filling if needed.
Step 22: Close the opening with a toothpick: pierce from the thicker outer skin to the thinner side, then back from the thinner side to the outside, bringing the skin edges together.
Step 23: Push the toothpick far enough through the flesh to secure the seal without crushing the filling.
Step 24: Repeat steps 19–23 with the other seven wing pockets and filling portions. Keep all eight sealed stuffed wings cold while the frying oil heats. Clean utensils and hands after handling the raw filling.
Step 25: Heat oil in a deep frying pan to 160°C / 320°F, with at least 4 cm depth. Keep a clean kitchen-paper-lined tray ready for the cooked wings.
Step 26: Lightly dust all eight stuffed wings with the separate tablespoon of coating cornstarch (1 tbsp), shaking off excess. Discard any leftover coating starch that contacted raw chicken.
Step 27: Place the first four coated wings in the 160°C oil without overcrowding. Deep-fry for six minutes on the first side, keeping the remaining wings cold.
Step 28: Turn the first four wings over and fry for another two minutes. Continue as needed until the chicken and centre of the pork-prawn filling reach 74°C / 165°F. Lift these cooked wings onto the clean lined tray, keeping the frying oil in the pan.
Step 29: Return the same oil to 160°C. Fry the remaining four wings for six minutes on one side, then two minutes on the other, extending cooking until the chicken and filling centres reach 74°C / 165°F. Drain beside the first batch so all eight wings have completed their first fry.
Step 30: Raise the same oil to 180°C / 356°F. Fry the cooked wings again in uncrowded batches for about two minutes per batch until crisp and golden. Transfer each batch back to the clean lined tray to drain.
Step 31: Wash and dry the cabbage pieces. Remove every toothpick from the cooked wings before serving. Serve the eight stuffed wings immediately with the cabbage and separate prepared chilli mayonnaise (2 tbsp).

Photos (1)
Comments
0 threadsSign in to join the discussion.


No comments yet. Start the discussion.