
Thai · Dessert
Coffee & Cream Agar Jelly
From the zcook collection
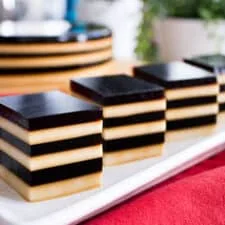
Alternating layers of dark Thai coffee agar jelly and creamy coconut-evaporated-milk jelly.
- Vegetarian
- Thai
- Dessert
- Prep
- 20 min
- Cook
- 10 min
- Serves
- one 8-inchroundpan
- Level
- Medium
Method18 steps
Step 1: Steep the Thai coffee powder (4–6 tbsp) in 1 1/2 cups (360ml) of hot off-the-boil water (1½ cups) for about 5 minutes. I put my coffee in a cloth "coffee bag" and let the bag sit in water (see video), but you can also add coffee directly to water and strain it out through whatever coffee filter or fine-weave cloth you have.
Step 2: Meanwhile in a small pot, mix agar agar powder and the remaining 1 1/2 cups (360ml) water in a small pot. Bring to a full boil over high heat, stirring constantly.
Step 3: Once it comes to a full boil, turn down the heat and check to see that the agar agar powder has completely dissolved by spooning some liquid into a metal spoon, then pour off the liquid and look to see if there are any grains of powder stuck to the spoon. If not, you're good to go!
Step 4: Add the coffee, sugar and a little pinch of salt to the agar agar solution. Bring to a simmer to make sure all the sugar has dissolved, then at this point you can taste to see if you're happy with how sweet it is. Feel free to add more sugar to taste.
Step 5: Keep the pot covered and hot while you make the cream layer.
Step 6: In another small pot mix the agar agar powder and the water in a small pot. Bring to a full boil over high heat, stirring constantly.
Step 7: Once it comes to a full boil, turn down the heat and check to see that the agar agar powder has completely dissolved.
Step 8: Add the coconut milk, evaporated milk, sugar and salt to the agar agar solution. Bring to a simmer to make sure all the sugar has dissolved, then at this point you can taste to see if you're happy with how sweet it is. Feel free to add more sugar or salt to taste.
Step 9: Keep the pot covered and hot.
Step 10: Use a heatproof mold; the full recipe fills an 8-inch by 2-inch round pan. If using a large rigid mold, grease it with a very light oil coating if needed. Flexible silicone or individual molds are easier to unmold.
Step 11: Pour the hot cream mixture through a fine sieve to catch any milk skin. Keep both mixtures covered and hot without allowing them to simmer away; rewarm gently if needed.
Step 12: Choose the colour you want on top after unmolding and start with that mixture. Pour a measured layer into the mold; the author uses 1 cup per layer, with about 3 cups total of each colour. Keep the unused mixtures hot.
Step 13: Let the first layer set just enough that you can press on it, while it is still soft and elastic underneath. Do not let it become cold and solid. A fan can speed setting. The author large mold took about 5 minutes for the first layer and up to 15 minutes for later layers; smaller molds set faster.
Step 14: Gently pour the other hot mixture onto the just-set first layer without breaking it. The new mixture should still be steaming so the layers bond.
Step 15: Continue alternating measured layers, allowing each to set just soft and elastic before the next hot pour. Use the remaining mixtures and keep them hot between pours; do not allow an intermediate layer to become cold and solid.
Step 16: When all layers are assembled, chill the mold in the refrigerator until the jelly is cold and fully set.
Step 17: Unmold close to serving time. For a rigid mold, run a thin spatula around the edge, adding a few drops of water if needed, then invert onto a platter or board and gently wiggle to release. For silicone, invert and press the bottom inward; loosen individual molds around the sides.
Step 18: Cut the chilled layered jelly into portions and serve. Keep it in its mold until near serving to limit water seepage from the cut or unmolded gel.
Photos (1)
Comments
0 threadsSign in to join the discussion.


No comments yet. Start the discussion.