
Korean · Snack
Garaetteok (Rice Cake Recipe)
From the zcook collection
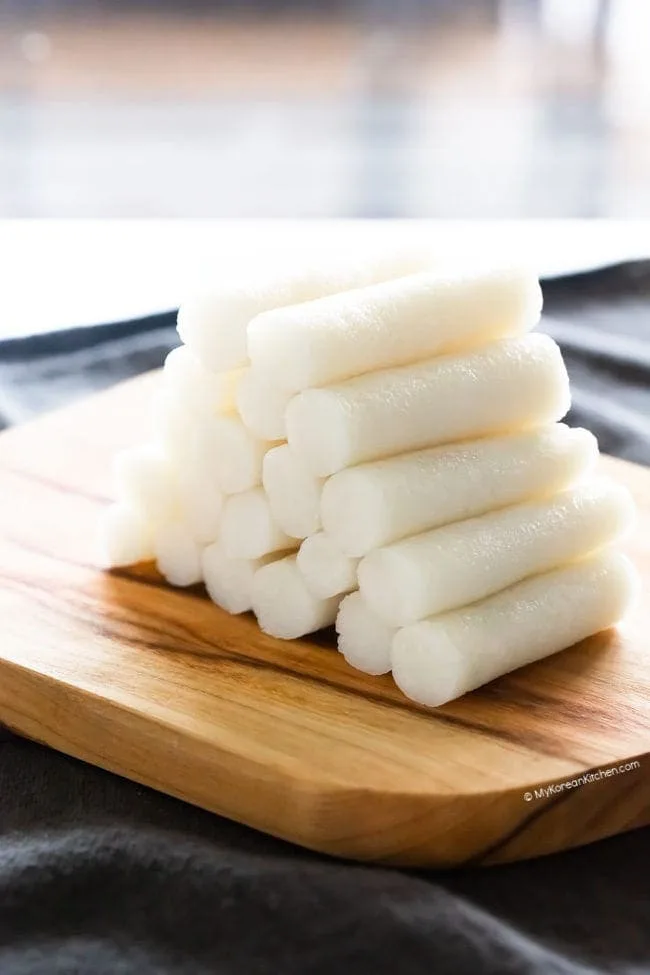
Chewy Korean rice cakes made from wet-milled rice flour. Choose microwave or steamer cooking and tteokbokki cylinders or tteokguk slices. The optional homemade-flour route requires an overnight soak; the author’s approximately 25-minute guide starts with ready wet-milled flour.
- Vegan
- Dairy-free
- Korean
- Side
- Snacks
- cylinder rice cake
- garaetteok
- Serves
- About 450 g rice cakes (4 servings)
- Level
- Hard
Method19 steps
Step 1: Choose ready wet-milled flour or make your own. With ready flour, skip steps 1–4 and choose either the microwave route (steps 5–9) or steamer route (steps 10–13). To make flour, rinse the optional 535 g (2 1/2 cups) short- or medium-grain rice until the water runs clear. Cover with water and soak about 12 hours or overnight; keep covered in the refrigerator during hot or humid weather.
Step 2: For the homemade-flour route, drain the soaked rice well in a fine-mesh strainer for about 1 hour to remove surface moisture.
Step 3: Grind the drained rice in a powerful food processor until flour-like. Work in batches if needed, stopping to scrape down and redistribute the grains.
Step 4: Sift the ground rice in small batches, then sift again. Regrind and re-sift coarse grains until very fine. This makes about 4 1/2 cups flour. Measure only 2 cups (300 g) for the rice cakes; freeze the extra flour in an airtight container for later use.
Step 5: Microwave route only: combine your chosen 2 cups wet-milled flour with the cornstarch (1 Tbsp), salt (1 tsp) and the first 1/4 cup boiling water in a microwave-safe bowl. Mix, then add a second 1/4 cup boiling water and mix again. It should be easy to stir rather than stiff like cookie dough; use a small additional spoonful of boiling water only if flour moisture requires it.
Step 6: Cover the microwave bowl with cling film, leaving a small vent. Microwave on high for 2 minutes in a 1250 W microwave.
Step 7: Carefully uncover the hot bowl and mix in the remaining 1/4 cup boiling water. Cover with a vent again and microwave on high for another 1 minute 30 seconds. Remove the bowl.
Step 8: Line a board with a silicone mat or several layers of cling film. Carefully transfer the hot microwave-cooked dough to it.
Step 9: Protect your hands with thick cotton gloves under food-safe gloves, or thick heat-resistant food-safe gloves. Knead and pound the hot dough with a pestle for about 5 minutes until smooth and elastic. Skip the steamer route and choose either tteokbokki shaping (steps 14–16) or tteokguk shaping (steps 17–19).
Step 10: Steamer route only: combine your chosen 2 cups wet-milled flour with the cornstarch (1 Tbsp) and salt (1 tsp). Gradually add the 1/4 cup boiling steamer-route water, mixing until lightly hydrated, not wet or fluid like batter. If necessary, add a little extra boiling water according to the flour moisture.
Step 11: Set water below a steamer and bring it to a boil. Line the steamer with a silicone steaming mat, perforated parchment or a clean tea towel. Spread the lightly hydrated flour mixture in small pieces over the liner. Cover and steam over high heat for 15 minutes.
Step 12: Line a board with a silicone mat or several layers of cling film. Transfer the hot steamed dough onto the mat.
Step 13: Protect your hands with thick cotton gloves under food-safe gloves, or thick heat-resistant food-safe gloves. Knead and pound for about 5 minutes until smooth and elastic. Choose either tteokbokki shaping (steps 14–16) or tteokguk shaping (steps 17–19).
Step 14: Tteokbokki shapes only: divide the elastic dough from your chosen cooking route into 5 equal pieces. Follow steps 15–16 and skip the tteokguk shapes.
Step 15: Lightly coat your palms with the 1/2 tsp sesame oil and rub it over the five dough pieces to prevent sticking.
Step 16: Roll each oiled piece into a cylinder 1–1.5 cm (0.4–0.6 inch) wide. Trim the ends and cut into 6 cm (about 2.5 inch) lengths. The cakes are ready for tteokbokki or another stir-fry; freeze cut cakes in a sealed bag for up to 1 month if not using them fresh.
Step 17: Tteokguk shapes only: divide the elastic dough from your chosen cooking route into 2 equal pieces. Use this route instead of steps 14–16.
Step 18: Lightly coat your palms with the same single 1/2 tsp sesame-oil supply for this chosen route. Rub it over the two pieces and roll into cylinders 2–3 cm (0.8–1.2 inch) wide.
Step 19: Cover the larger cylinders and refrigerate about 1 hour until firm for cleaner slicing, or slice sooner if necessary. Cut diagonally into ovals about 0.5 cm (0.2 inch) thick. The cakes are ready for tteokguk; freeze the cut cakes in a sealed bag for up to 1 month if not using them fresh.
Photos (1)
Comments
0 threadsSign in to join the discussion.



No comments yet. Start the discussion.